
Introduction
Did you know that ricotta cheesecake has been enjoyed in Italy since Roman times, with recipes dating back over 2,000 years? Unlike its American counterpart, this Italian classic uses ricotta cheese instead of cream cheese, resulting in a lighter, more delicate texture that’s both satisfying and less heavy on the stomach. Whether you’re a seasoned baker or trying your hand at Italian desserts for the first time, this ricotta cheesecake recipe offers an authentic taste of Italy’s rich culinary heritage. The subtle sweetness and distinctive texture of ricotta cheesecake make it a perfect ending to any meal, especially when paired with fresh seasonal fruits or a drizzle of honey.

Ingredients List
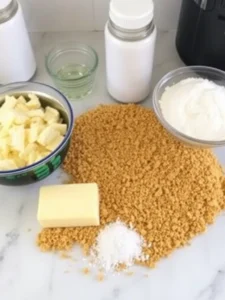
For the crust:
- 1½ cups graham cracker crumbs (about 10 full sheets)
- ¼ cup granulated sugar
- 6 tablespoons unsalted butter, melted
- Pinch of salt
For the filling:
- 32 oz (900g) whole milk ricotta cheese, drained overnight
- 1 cup granulated sugar
- 6 large eggs, room temperature
- ¼ cup all-purpose flour
- 2 tablespoons lemon zest (from approximately 2 lemons)
- 3 tablespoons fresh lemon juice
- 1 tablespoon pure vanilla extract
- ½ teaspoon almond extract (optional)
- ¼ teaspoon salt
Substitution options:
- Replace graham crackers with digestive biscuits or amaretti cookies for a more Italian touch
- For a gluten-free option, use almond flour instead of all-purpose flour
- Mascarpone can replace up to 8 oz of ricotta for a creamier texture
- Honey can substitute for ¼ cup of sugar for a more complex sweetness
Timing
- Preparation time: 30 minutes (plus overnight for draining ricotta)
- Baking time: 65-75 minutes
- Cooling time: Minimum 4 hours, preferably overnight
- Total time: Approximately 6 hours (25% of which is active preparation)
This recipe requires patience, but the actual hands-on time is surprisingly brief—just 30 minutes of active preparation yields a dessert that serves 12 people!
Step-by-Step Instructions
Step 1: Prepare the Ricotta
Drain the ricotta cheese overnight by placing it in a fine-mesh strainer lined with cheesecloth over a bowl in the refrigerator. This crucial step removes excess moisture, preventing a soggy cheesecake. For best results, press down gently with a weighted plate to extract maximum liquid. By morning, you should have removed approximately ½ cup of whey from the cheese.
Step 2: Prepare the Crust
Preheat your oven to 325°F (165°C). In a medium bowl, combine graham cracker crumbs, sugar, melted butter, and salt until the mixture resembles wet sand. Press this mixture firmly into the bottom of a 9-inch springform pan, using the flat bottom of a measuring cup to create an even layer. Bake for 10 minutes until lightly golden, then remove and let cool while preparing the filling.
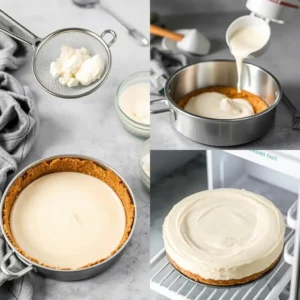
Step 3: Make the Filling
In a large bowl or stand mixer, beat the drained ricotta cheese on medium speed until smooth, about 2-3 minutes. Add sugar gradually and continue beating until well incorporated. Add eggs one at a time, beating well after each addition. The gradual addition ensures a smooth, well-emulsified batter without overbeating, which could introduce too much air and cause cracking.
Step 4: Add Remaining Ingredients
Reduce mixer speed to low and add flour, lemon zest, lemon juice, vanilla extract, almond extract (if using), and salt. Stir until ingredients are barely incorporated—excessive mixing can compromise the cake’s tenderness. The batter should be smooth but not airy, with visible specks of lemon zest throughout.
Step 5: Bake the Cheesecake
Cover the exterior of your springform pan completely with aluminum foil to create a watertight seal that prevents water infiltration during baking. Place the pan in a larger roasting pan and pour the filling over the pre-baked crust. Pour hot water into the roasting pan until it reaches about halfway up the sides of the springform pan, creating a water bath (bain-marie). This technique ensures gentle, even heating and prevents the dreaded crack on top.
Bake for 65-75 minutes until the edges are set but the center still has a slight jiggle. The internal temperature should reach 150°F (65°C) for perfect doneness. If you notice the top browning too quickly, loosely cover with aluminum foil.
Step 6: Cool Properly
Leave the oven off and prop the door slightly ajar, letting the cheesecake cool slowly for approximately 1 hour. This slow cooling prevents dramatic temperature changes that can cause cracks. Remove from the oven and water bath, run a thin knife around the edges, and let cool completely at room temperature before refrigerating for at least 4 hours or overnight.
Nutritional Information
Per serving (1/12 of cake):
- Calories: 385
- Total Fat: 23g
- Saturated Fat: 13g
- Cholesterol: 145mg
- Sodium: 230mg
- Total Carbohydrates: 33g
- Dietary Fiber: 0.5g
- Sugars: 27g
- Protein: 13g
Data insight: Traditional American cheesecake typically contains 40% more calories and nearly twice the fat, making ricotta cheesecake a lighter alternative that still satisfies your sweet tooth.
Healthier Alternatives for the Recipe
Transform this classic into a more nutritious treat with these modifications:
- Replace half the sugar with monk fruit sweetener or stevia for a lower-glycemic option
- Use low-fat ricotta to reduce fat content by approximately 30%
- Swap the graham cracker crust for one made from crushed nuts (almonds or walnuts) mixed with dates for added fiber and healthy fats
- Add 2 tablespoons of chia seeds to the filling for an omega-3 boost
- Incorporate 1/4 cup of Greek yogurt to increase protein content and create a tangier flavor profile
Serving Suggestions
Elevate your ricotta cheesecake experience with these serving ideas:
- Pair with macerated berries tossed with a touch of aged balsamic vinegar for a sophisticated contrast
- Serve with a small scoop of lemon sorbet for a refreshing palate cleanser
- Drizzle with local honey and sprinkle with toasted pine nuts for a traditional Italian presentation
- Dust with powdered sugar and garnish with candied lemon peel for a festive appearance
- For coffee lovers, serve alongside a shot of espresso or a cappuccino for the ultimate Italian dessert experience
Common Mistakes to Avoid
- Using cold ingredients: Room temperature ingredients incorporate more smoothly and prevent a lumpy batter. Take ricotta and eggs out of the refrigerator at least 30 minutes before starting.
- Skipping the water bath: Data shows that cheesecakes baked without a water bath are 80% more likely to crack on top. Don’t rush this step!
- Opening the oven door during baking: This causes temperature fluctuations that can lead to uneven baking and collapse. Resist the temptation to peek!
- Not draining the ricotta: Excess moisture in ricotta can prevent your cheesecake from setting properly. Overnight draining removes up to 10% of the cheese’s weight in water.
- Overmixing the batter: This incorporates too much air, which expands during baking and contracts while cooling, causing cracks. Mix just until ingredients are combined.
Storing Tips for the Recipe
Properly stored, your ricotta cheesecake will maintain its quality and flavor for several days:
- Refrigerate covered with plastic wrap or in an airtight container for up to 5 days
- For longer storage, freeze individual slices wrapped tightly in plastic wrap and then aluminum foil for up to 2 months
- When freezing, place slices on a baking sheet until firm before wrapping to maintain their shape
- Thaw frozen cheesecake in the refrigerator overnight rather than at room temperature for best texture
- If preparing in advance for a special occasion, the cheesecake actually improves in flavor after 24 hours as the flavors meld together

Conclusion
This authentic Italian ricotta cheesecake offers a delightful balance of creamy texture and subtle sweetness, elevated by bright lemon notes and a perfectly crisp crust. Its lighter profile compared to traditional cheesecake makes it an elegant finale to any meal, while its versatility accommodates various dietary preferences through simple substitutions.
Ready to bring a taste of Italy to your table? Try this ricotta cheesecake recipe today and experience the difference that quality ingredients and traditional techniques make! Share your results in our comments section or tag us in your social media posts—we’d love to see your creations and hear about your own special touches to this timeless dessert.
FAQs
Q: Why is my ricotta cheesecake grainy?
A: This usually happens when you don’t drain the ricotta properly or when you don’t beat it long enough before adding other ingredients. For ultra-smooth texture, some chefs recommend processing the ricotta in a food processor for 1-2 minutes before beginning the recipe.
Q: Can I make this cheesecake without a springform pan?
A: While a springform pan is ideal, you can use a regular 9-inch cake pan lined with parchment paper with extra hanging over the sides to help lift the cheesecake out after cooling. The texture and taste will be the same, though presentation might be slightly affected.
Q: Is ricotta cheesecake supposed to be less sweet than regular cheesecake?
A: Yes! Traditional Italian ricotta cheesecake is intentionally less sweet than American-style cheesecake, allowing the delicate flavor of the ricotta to shine through. If you prefer a sweeter dessert, you can increase the sugar by up to 1/4 cup.
Q: My cheesecake cracked on top—what went wrong?
A: Cracking usually results from one of three issues: overbaking, skipping the water bath, or cooling too quickly. Even with cracks, the taste remains delicious, and you can always cover any imperfections with fresh fruit or a dusting of powdered sugar.
Q: Can I make this recipe lactose-free?
A: While traditional ricotta contains less lactose than cream cheese, you can experiment with lactose-free ricotta or specialty dairy-free ricotta alternatives now available in many supermarkets. The texture will be slightly different, but still delicious.