
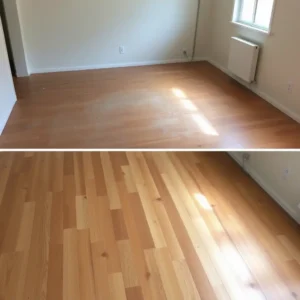
Wood floors add warmth and character to any home, but over time, they can become scratched, dull, or worn. Refinishing your wood floors is a cost-effective way to restore their natural beauty without the need for a full replacement. Whether you’re dealing with minor scuffs or deep scratches, this guide will walk you through the essential steps—from sanding to staining and sealing—to bring your floors back to life. Get ready to transform your space with a fresh, polished finish!
Why Refinish Your Wood Floors?
Signs Your Wood Floors Need Refinishing
Hardwood floors are durable and can last for decades, but over time, they start to show signs of wear and tear. Recognizing when it’s time for refinishing can help prevent further damage and keep your floors looking beautiful. Here are the key signs that indicate your floors need refinishing:
1. Scratches and Surface Damage :
Light scratches are common, but deep scratches that penetrate the wood layer can make floors look worn and unattractive. These deep marks can also weaken the wood, making it more susceptible to damage.
2. Dullness and Loss of Shine :
If your floors look faded and lack their original luster, it’s a sign that the finish has worn off. A fresh coat of stain and sealant can restore their shine.
3. Discoloration and Stains :
Water damage, pet stains, and sun exposure can cause discoloration. If dark spots or uneven coloring appear, sanding and refinishing can even out the tone.
4. Visible Wear in High-Traffic Areas :
Entryways, hallways, and kitchens experience more foot traffic, leading to faster wear. If these areas look more faded than others, refinishing is necessary.
5. Splinters or Rough Texture :
If walking barefoot on your wood floors feels rough or you notice splinters, the surface has likely deteriorated, requiring refinishing to restore smoothness.
Benefits of Refinishing
Refinishing your hardwood floors provides numerous benefits beyond just improving appearance:
Restores Beauty – Bringing back the original color, texture, and shine can make your home look more elegant and inviting.
Extends Lifespan – A well maintained floor can last generations. Refinishing protects the wood from further damage.
Increases Home Value – Hardwood floors are a selling point in real estate. Refinished floors enhance curb appeal and attract buyers.
Improves Safety – Worn-out floors with splinters, cracks, or loose boards can be hazardous. Refinishing eliminates these risks.
Saves Money Over Time – Rather than replacing floors, refinishing is a cost-effective solution that revitalizes them at a fraction of the cost.
DIY vs. Professional Refinishing
When deciding whether to refinish wood floors yourself or hire a professional, consider the following factors:
- Cost – DIY refinishing costs less but requires equipment rental. Professional refinishing is more expensive but ensures expert results.
- Time Commitment – A DIY project can take several days, whereas professionals can complete the job faster with high-quality results.
- Skill Level – Sanding and staining require precision. Mistakes like uneven sanding or over-application of stain can ruin the finish.
- Equipment Access – Professionals use industrial-grade tools for a smoother and more polished result, while DIYers may struggle with rental tools.
If you have experience with home improvement projects, a DIY refinishing job may be manageable. Otherwise, hiring a professional guarantees a flawless finish with minimal effort.

Tools & Materials Needed for Refinishing Wood Floors
Sanding Equipment
Sanding is the most crucial step in refinishing wood floors. You’ll need the following equipment:
- Drum Sander – Ideal for sanding large areas, but requires careful handling.
- Orbital Sander – Used for corners and edges where the drum sander can’t reach.
- Sandpaper Grits – Start with coarse grit (36-40), then use medium grit (60-80), and finish with fine grit (100-120) for a smooth surface.
Cleaning & Prep Supplies
Before sanding, floors must be cleaned and prepped:
- Wood Filler – Used to repair cracks and gaps before sanding.
- Tack Cloth – Helps remove fine dust particles after sanding.
- Vacuum Cleaner – Essential for removing debris between sanding stages.
Stains & Finishes
Choosing the right stain and finish affects the final look and durability of your floors:
- Oil-Based vs. Water-Based Polyurethane – Oil-based gives a warm glow, while water-based dries faster and has a clear finish.
- Popular Stain Colors – Golden oak, dark walnut, ebony, and gray tones are trending choices.
Protective Gear
Safety is essential when refinishing wood floors. Ensure you have:
- Dust Mask – Protects against inhaling fine dust particles.
- Safety Goggles – Shields eyes from flying debris.
- Gloves – Keeps hands safe from stains and chemicals.
Step-by-Step Guide to Refinishing Wood Floors
Step 1: Preparing the Floor
- Remove all furniture and rugs.
- Clean the floor thoroughly to remove dust and debris.
- Fill gaps and cracks with wood filler.
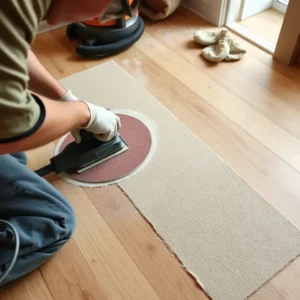
Step 2: Sanding the Floor
- Start with coarse sandpaper to remove the old finish.
- Progress to medium grit, then fine grit for a smooth finish.
- Vacuum and wipe with a tack cloth between sanding stages.
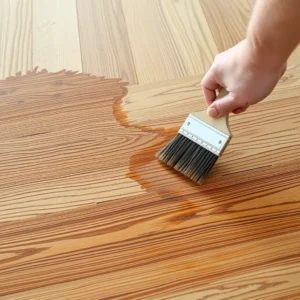
Step 3: Staining & Sealing
- Apply stain evenly with a brush or cloth, following the wood grain.
- Allow stain to dry before applying polyurethane.
- Use a high-quality sealer to protect the wood.
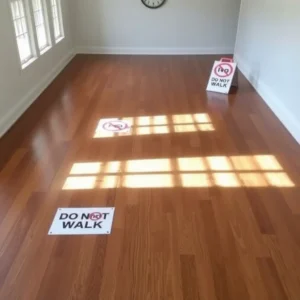
Step 4: Drying & Curing
- Allow 24-48 hours for stain and sealer to dry.
- Wait at least a week before placing furniture back on the floor.
Common Mistakes to Avoid When Refinishing Wood Floors
- Skipping Proper Sanding – Leads to an uneven finish and poor stain absorption.
- Not Cleaning Between Steps – Dust particles can create a rough surface.
- Using Too Much or Too Little Stain – Can result in blotchy or faded areas.
- Rushing the Drying Process – Walking on the floor too soon can ruin the finish.
Maintaining Your Refinished Wood Floors
Best Cleaning Practices
- Use a microfiber mop for daily cleaning.
- Avoid excessive water and harsh chemicals.
Protecting the Finish
- Place rugs in high-traffic areas.
- Use furniture pads to prevent scratches.
When to Recoat vs. Refinish Again
- If the finish looks dull but the wood is intact, a new topcoat may be enough.
- Deep scratches or discoloration may require another full refinishing.